Battle of Gazala
|
||||||||||||||||||||||||||||||
|
||||||||||||||||||||||||||||||

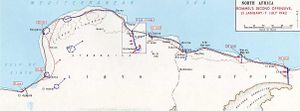
Area of Rommel's advance from El Agheila to El Alamein 21 January-21 June 1942 (Click to enlarge)
|
||||||||||||||||||||||||||||||
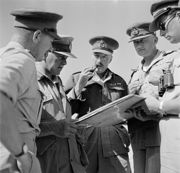
The Battle of Gazala was an important battle of the Second World War Western Desert Campaign, fought around the port of Tobruk in Libya from 26 May-21 June 1942. The combatants on the Axis side were the Panzer Army Afrika, consisting of German and Italian units and commanded by the "Desert Fox" Colonel-General Erwin Rommel; the Allied forces were the Eighth Army, commanded by Major General Neil Ritchie under the close supervision of the Commander-in-Chief Middle East, General Sir Claude Auchinleck. The battle ended in a resounding victory for the Axis. However, devoid of effective armoured forces in subsequent battles, Rommel was unable to pursue and decisively defeat the Eighth Army in Egypt.[nb 2]
Contents |
Prelude
Rommel advances from El Agheila again
Following the successful Operation Crusader, in late 1941, the Eighth Army had driven the Axis forces out of Cyrenaica and forced Rommel to withdraw to strong defensive positions he had prepared at El Agheila. However, their 500+ mile advance had over-stretched their lines of supply and in January 1942 they had thinned out their front line troops to work on building lines of communications and supply dumps to enable a further thrust west to be made against Tripolitania. Meanwhile, Rommel had received reinforcements in men and tanks, and on 21 January sent out three strong armoured columns to make a tactical reconnaissance. Finding only the thinnest of screens in front of him he rapidly changed his reconnaissance into an offensive. He recaptured Benghazi on 28 January, and Timimi on 3 February and pressed on towards the fortified port of Tobruk on the Mediterranean coast.
Eighth Army digs in on the Gazala line
Between Gazala and Timimi (just west of Tobruk) the Eighth Army was able to concentrate its forces sufficiently to turn and fight. By 4 February, Rommel's advance had been halted and the front line had been stabilised running from Gazala on the coast (30 mi (48 km) west of Tobruk) to the town of Bir Hakeim, 50 mi (80 km) to the south.
The "Gazala Line" was a series of occupied "boxes" each of brigade strength set out across the desert with minefields and wire watched by regular patrols between the boxes. The Free French were to the south at the Bir Hakeim box. The line was not equally staffed with a greater number of troops covering the coast leaving the south less protected.
Both armies prepare
During the early spring both sides concentrated on building their supplies and their tank strength, well aware that over the previous two years there had been five separate swings of the pendulum across the desert all of which had ultimately failed because of the victors of the respective battles had lacked the capacity to follow up and exploit their success.[5]
Other lessons had also been learned: the British armoured divisions started to re-equip with General Grant tanks with a 75 mm gun matching those of the German Panzer IV and reorganising their support to speed maintenance and repair during battle, an area where the Axis armour had displayed a clear superiority. Also reorganised was the relationship between infantry and artillery while Middle East airforce commander Arthur Tedder introduced a new strategy focusing the Desert Air Force role during battle on supporting the troops on the ground rather than destroying the opposing air force. A new fighter-bomber concept was developed and Air Vice-Marshal Arthur Coningham, commander of the Desert Air Force, moved himself and his staff to the army commander's camp to improve co-operation.[6]
Meanwhile, Rommel was building his supplies as quickly as possible. He was aware that he could take advantage of the shortness of his sea route home to build up more quickly than Auchinleck, who was dependent on a 14,000 mi (23,000 km) route round the Cape of Good Hope, and attack before the Eighth Army were prepared.[7] By late May Rommel was ready. Facing him on the Gazala defences were 1st South African Division, nearest the coast, 50th (Northumbrian) Infantry Division (on their left) and 1st Free French Brigade furthest left at Bir Hakeim. The British 1st and 7th Armoured Divisions waited behind the main line as a mobile counter-attacking force while 2nd South African Division formed a garrison at Tobruk and 5th Indian Infantry Division (which had arrived in April to relieve 4th Indian Infantry Division) were held in reserve.
Rommel's plan
Rommel's plan for Operation Venezia[8] was to have his armour execute a flanking manoeuvre south of the fortified "box" at Bir Hacheim. On the left of his formation the Italian 132 Armoured Division Ariete would neutralise the Bir Hacheim box while on their right 21st Panzer Division and 15th Panzer Division would advance north behind the Eighth Army defences to engage and destroy the British armour and cut off the divisions on the Gazala line. On the far right of the attacking formation the German 90th Light Afrika Division Battle Group was to advance to El Adem, south of Tobruk, to interfere with the lines of supply to the Gazala position and pin potential reinforcements to the Tobruk area by simulating a strong armoured force through the use of dust machines (aero engines and propellers mounted on trucks).[9]
Meanwhile the other half of the Italian XX Motorized Corps, the Italian 101st Motorized Division Trieste would open a gap in the minefield north of the Bir Hacheim box near the Sidi Muftah box to create a supply route to the armour. Rommel anticipated that having dealt with the British armour he would have captured El Adem, Ed Duda and Sidi Rezegh by nightfall as well as the Knightsbridge defensive box some 25 mi (40 km) northeast of Bir Hacheim. He would then be in a position for his armour the next day to thrust west against the Eighth army defensive positions between Gazala and Alem Hamza, meeting the attack from the west by the Italian X and XXI Corps.[10]
Battle
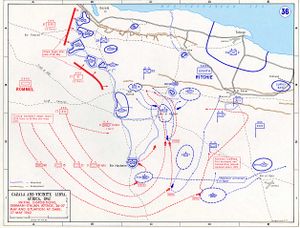
Rommel makes a flanking attack
At 14:00 on 26 May, the Italian X and XXI Corps, after a heavy artillery concentration, launched a frontal attack on the central Gazala positions. For deception purposes small elements of the Afrika and XX Mobile Corps were attached to the assault groups to give the impression that all the Axis forces were committed to this assault. The deception was reinforced by further elements of the mobile units continuing to move north towards the point of attack. However, that evening, under cover of darkness, all the armoured and mobile elements returned to their concentration point at the southern end of the Gazala line.[11]
In the early hours of 27 May, Rommel personally led the elements of Panzer Army Afrika — the Afrika Korps, the Italian XX Motorised Corps, and the German 90th Light Afrika Division — in the brilliant but risky flank around the southern end of the Allied lines, trusting to the enemy's own minefields to protect his flank and rear.
Rommel's plan started to go wrong at Bir Hacheim. The Ariete and Trieste divisions of XX Motorized Corps and elements of 21st Panzer Division were held up for three hours by 7th Armoured Division's 3rd Indian Motor Brigade, dug in some four miles south east of Bir Hacheim and suffered heavy losses from their guns before over-running them.[12] The Bir Hacheim box, defended by the 1st Free French Brigade under Marie-Pierre Koenig, also proved to be a bigger problem than Rommel had anticipated (see Battle of Bir Hakeim), and the Ariete failed to take the position while suffering heavy losses from the French 75 mm guns in the process.[13][14]
Further to the east, the 15th Panzer Division had engaged 7th Armoured Division's 4th Armoured Brigade which had been ordered south to support the 3rd Indian and 7th Motorised Brigades,[15] and inflicted heavy casualties but also took significant losses, surprised by the range and power of the 75 mm guns on the newly arrived Grant tanks.[16] The 4th Armoured Brigade then withdrew towards El Adem and spent the night near the Belhamed supply base east of El Adem.[15]
By late morning, the Axis armoured units had advanced more than 25 mi (40 km) north, but by midday their momentum had been blunted when they came into contact with and were held by 1st Armoured Division in heavy fighting which saw both sides taking losses.[15]
On the far right of the Axis advance, the 90th Light Afrika Division had engaged the 7th Motorised Brigade at Retma and forced it to withdraw east towards Bir el Gubi.[17] Resuming their advance towards El Adem the 90th Light mid-morning came upon the advanced HQ of 7th Armoured Division near Bir Beuid, dispersing it and capturing a number of key officers including the division's commander, Frank Messervy. However, he pretended to be a batman and escaped.[18] Nevertheless, the disruption caused by this meant that the division was without effective command for the next two days.[15]
As planned, 90th Light division reached the El Adem area by mid-morning and captured a number of supply bases. The Allies were slow to react but by afternoon there was stiff fighting.[19] The following day however, 4th Armoured Brigade were sent to El Adem and the 90th Light were driven back to the south west.[20]
The tank battle continued for three days and with Bir Hakeim holding out, the Panzer Army Afrika found itself trapped in a region known as "the Cauldron", with Bir Hakeim to the south, Tobruk to the north, and the extensive mine belts of the original Allied front line to the west, and assailed by Allied armour from the north and east. Rommel's supply position by the evening of 31 May was getting desperate. Tasked to defend the German rear, the Ariete Armoured Cavalry Division in the meantime fought off repeated attacks by the British armoured brigades on 29 May and during the first week of June.[14]
From a German account of this action:[21]
During the first ten days of our attack against the French the British had remained amazingly calm. The "Ariete" Division alone was attacked by them on 2 June, but it defended itself stubbornly. After a counterattack by the 21st Panzer Division the situation again there became quiet.
The "Ariete" Division had allegedly during this period, killed an undetermined number of British wounded. The murdered men were patients, medical officers, orderlies and ambulance drivers from an advanced dressing station, according to a platoon of the British 1st Battalion Worcestershire Regiment.[22]
Panzer Army Afrika retains the initiative in "the Cauldron"
Finding himself trapped between an extensive minefield and stiff British resistance, Rommel was contemplating surrender. However, early on 29 May supply vehicles, supported by the Italian "Trieste" and "Ariete" Divisions, and under heavy fire, were able to penetrate the minefield north of Bir Hacheim, and move in much needed supplies to the trapped Axis forces thus allowing Rommel to regain his composure.[23][24] On 30 May he attacked westward back toward his own original front line in order to establish a bridgehead on the eastern side of the minefield and link up with elements of Italian X Corps which were clearing a route through the minefields from the west.[23][25] In this westerly attack over the next two days, he destroyed 50th (Northumbrian) Infantry Division's British 150th Infantry Brigade in the Sidi Muftah box and two gaps in the minefield back to his home lines were created, giving him his direct supply route and splitting the Allied front in half.
On the night of 1 June, Rommel sent the 90th Light and Trieste divisions south to renew the attack on Bir Hacheim from which position raiding groups were continually being sent to harass his line of supply. Once again the assault failed and the struggle for Bir Hacheim was to continue for a further 10 days.[21]
Unaware of the extent of Rommel's desperate supply situation but buoyed by over-optimistic intelligence assessments of the casualties suffered by the German armour, Auchinleck strongly urged Ritchie to mount a counter-attack along the coast to take advantage of the German armour's absence and to break through to Timimi and then Mechili. However, Ritchie was more concerned by Tobruk's exposure and focused on bringing up reinforcements into the El Adem box and creating new defensive boxes opposite the new gaps in the minefield.[26]
On 5 June, Eighth Army finally launched its counter attack but the opposition had had a number of days to prepare and in the north XIII Corps made no progress. The attack by 7th Armoured and 5th Indian Infantry Divisions on the eastern flank of the cauldron launched at 02:50 on 5 June initially went well as the preliminary infantry advance secured objectives to plan. However, the main Axis defences were further west than expected and so when 22nd Armoured Brigade passed through they were met by intense fire and their advance checked.[27] At dawn, the 32nd Army Tank Brigade had joined the attack, advancing from the north, and had also run into heavy fire and lost 50 of 70 tanks involved.[28]
By early afternoon on 5 June, Rommel decided to attack east with the Ariete and 21st Panzer Divisions and northwards towards the Knightsbridge defensive box with elements of 15th Panzer Division.[29] The eastward thrust towards Bir el Hatmat dispersed the tactical HQs of the two British Divisions as well as the HQs of the 9th and 10th Indian Infantry Brigades and other smaller units. Command and control broke down completely.[29] 22nd Armoured Brigade, having lost 60 of its 156 tanks, was forced from the battlefield by renewed attacks from 15th Panzer. Of the Allied attack, three Indian infantry battalions, a reconnaissance regiment and four artillery regiments were left in the cauldron. Unsupported by armour they faced an overwhelming task on 6 June and were one by one over-run.[30]
Rommel continued to hold the initiative, building up his strength in the Cauldron and sending out thrusts at the various opposing strong points. Between 6 and 8 June, he launched further concerted attacks on Bir Hacheim but although the defensive perimeter was shrunk the French defenders continued to hold out and exact a heavy toll with their guns with the support of columns from the 7th Motor Brigade and 29th Indian Infantry Brigade which continued to harass the enemy's communications.[31] Reinforced with a further combat group, the Axis attacked again on 9 June, finally breaking deep into the defences on 10 June.[32] At this time the Free French position had become untenable and Ritchie ordered them to evacuate that evening.[33] Despite being surrounded, General Koenig was able to find gaps in the Axis positions to withdraw through and make rendezvous with transport from 7th Motor Brigade some 5 miles (8.0 km)to the west.[34] About 2,700 troops (including 200 wounded) of the original garrison of 3,600 made it out of Bir Hacheim.[34] When the 90th Light Division occupied the position on 11 June, they took into captivity only 500 Frenchmen, mainly wounded who had been unable to travel.[35]
The British Armour is heavily defeated
On 11 June, Rommel pushed 15th Panzer and 90th Light Afrika towards El Adem and by 12 June had forced 201st Guards Brigade to withdraw from the Knightsbridge Box to the Tobruk perimeter.[18] 29th Indian Infantry Brigade repulsed an attack on the El Adem box on 12 June but 2nd and 4th Armoured Brigades on their left were pushed back four miles by 15th Panzer and forced to leave their damaged tanks on the battlefield unretrieved. On 13 June, 21st Panzer advanced from the west to join the battle, engaging 22nd Armoured Brigade. Once again the Afrika Korps demonstrated their superior tactics in combining tanks and anti-tank guns as an attacking weapon. By the end of the day, the British tank strength had been reduced from 300 tanks to nearer 70 and the Afrika Korps held a dominating line of positions posing a severe threat not only to Tobruk but to cutting off the XIII Corps units on the Gazala line. Throughout the Eighth Army, 13 June became known as "Black Saturday".[36] By the end of 13 June, the Knightsbridge box was virtually surrounded and so it was abandoned that night.[29]
Eighth Army withdraws from the Gazala line
On 14 June, Auchinlek authorised Ritchie to withdraw from the Gazala line. The defenders in the El Adem and two neighbouring boxes held firm and the 1st South African Division was able to withdraw along the coastal road practically intact.[37] The road could not accommodate two divisions so the remaining two brigades of the 50th (Northumbrian) Division had to find an alternative. They could not retreat directly east because of the presence of the Axis armour so, instead, they attacked south west breaking through the lines of the Italian X Corps' Brescia and Pavia Divisions and headed south into the desert before turning east and heading back to friendly territory.[38]
It was clear to Auchinleck that London would not contemplate a withdrawal to the stronger defensive positions around the Egypt-Libya frontier. Auchinleck's orders to Ritchie on 14 June therefore were to hold a line running south east from Acroma (west of Tobruk) through El Adem to Bir El Gubi.[39] However, by the evening of 15 June the strongpoint at Point 650 had been overrun and on 16 June the defenders at Point 187 had been forced by failing supplies to evacuate. Throughout that day the defensive boxes at El Adem and Sidi Rezegh were also under heavy pressure from the Afrika Korps. On 17 June both had been evacuated and any chance of preventing the encirclement of Tobruk had vanished. Ritchie ordered Eighth Army to withdraw to the defensive positions at Mersa Matruh, some 100 mi (160 km) east of the frontier, leaving Tobruk to hold out and threaten the Axis lines of communication in much the same way as in 1941.[40]
Tobruk falls
XIII Corps commander Gott had appointed 2nd South African Division's Klopper as commander of the Tobruk garrison. In addition to the division's two South African brigades, he also had 201st Guards (Motorised), 11th Indian Infantry Brigade, 32nd Army Tank and 4th Anti-Aircraft Brigades under command.[40] Tobruk had previously withstood a siege of nine months before being relieved by Operation Crusader in December 1941, but this time the Royal Navy could not make a commitment to keep the garrison supplied. Allied leaders expected it to be able to hold out for two months with its supplies.[41] Auchinleck however viewed the defence of Tobruk as non-essential and had already told Neil Ritchie that he did not intend to hold it at all costs.[42] Furthermore, it was commonly known that in February 1942 the Army, Navy and Air Force Commanders-in-Chief in Cairo had agreed that Tobruk should not stand another siege. Given this and the subsequent emphasis on building strength at the Gazala position for an attack (which had been forestalled by the Axis offensive) it is likely that the defences at Tobruk had not been maintained in first rate condition.[43]
Just seven days later, on 21 June 1942, in circumstances that even with the benefit of a subsequent formal court of enquiry remain obscure and contradictory, 35,000 Allied troops (including the entire South African 2nd Division), were surrendered to General Enea Navarrini's 30,000 troops. The Axis capture of Tobruk echoed the surrender of 80,000 Commonwealth troops to three Japanese divisions following the fall of Singapore a few months earlier.
Aftermath
Immediately after his capture of Tobruk Rommel was promoted field-marshal.[44] By contrast, the defeat at Gazala and Tobruk's surrender led to the dismissal of Ritchie with Auchinleck taking direct command of the Eighth Army.
After capturing Tobruk, Panzer Army Afrika advanced towards Egypt. Auchinleck bought time by refusing to confront Rommel's forces directly but harried them using relatively small but powerful battle groups. He decided to abandon the Mersa Matruh position because it had an open flank to the south of the sort well exploited by Rommel at Gazala. He decided instead to withdraw a further 100miles or more east to near El Alamein where the steep slopes of the Quattara Depression ruled out the possibility of armour moving round the southern flank of his defences.
Despite this victory, Axis armour losses were irreplaceable. The weakening of the Panzer Divisions after the battle had severely damaged the power of the Afrika Korps. As a result, Rommel was not able to take advantage of this success. The substantial reinforcements of American-made armour ensured the British had numerical superiority for the rest of the North African Campaign.[45]
Rommel made several attacks on the Alamein Line between 30 June and 1 July in the First Battle of El Alamein but was repulsed. Despite Auchinleck's success in halting the Axis advance here, Churchill had lost confidence in him. He had shown considerable talent as an army commander but his choice of subordinates had proved weak or unlucky. He had expected Neil Ritchie to command an army having only had command experience as a divisional commander; he moved Eighth Army's most experienced armour commander, Gott, from 7th Armoured Division to command XIII Corps, an infantry formation; he moved Frank Messervy to command 7th Armoured Division having only had infantry and cavalry command experience.
Rommel knew the serious position of the Axis forces after the battle. Rommel noted in his diary on 4 July; "Our own forces are worn out". On 5 July, Rommel describes the situation as critical; on 17 July, he says, "The enemy, superior especially in infantry, is swallowing up one Italian unit after the other. The Germans are much too weak to hold themselves. I could weep!".[46] In August, Auchinleck was replaced as Eighth Army commander by XIII Corps commander Lieutenant-General William Gott and as C-in-C Middle East Command by General Sir Harold Alexander. Gott was killed in an air crash on the way to take up his command and Bernard Montgomery was appointed in his place.
An attempted landing was made at Tobruk during the night of 13–14 September, 1942 (Operation Agreement). The British force was to remain at Tobruk for a full day, leaving with a sizeable proportion of the 16,000 British prisoners. The assumption was made that the defending Italian forces would not put up much of a fight. The raiding forces failed in the face of heavy fire from the Italian coastal batteries that sank HMS Sikh and spirited resistance from the Italian San Marco Marine battalion stationed there.[47] As resistance collapsed and the raiding force withdrew, a Luftwaffe Junkers 88 (Oblt. Göbel) sank the light cruiser HMS Coventry and a Regia Aeronautica MC 200 (Major Viale) sank the destroyer HMS Zulu. The total British killed and wounded incurred during Operation Agreement included 280 naval personnel, 300 Royal Marines and 160 soldiers killed, wounded or captured.
Orders of battle
Allies
Middle East Command (Claude Auchinleck)
-
- Eighth Army (Ritchie)
- XIII Corps (Gott)
- South African 1st Infantry Division (Pienaar)
- South African 1st Infantry Brigade Group
- South African 2nd Infantry Brigade Group
- South African 3rd Infantry Brigade Group
- South African 2nd Infantry Division (Klopper) (in Tobruk)
- South African 4th Infantry Brigade Group
- South African 6th Infantry Brigade Group
- 9th Indian Infantry Brigade Group (Fletcher) (from Indian 5th Infantry Division and moved to 7th Armoured Division at the Cauldron in early June)
- 11th Indian Infantry Brigade (Anderson) (from Army Reserve to replace 9th Indian Infantry Brigade)
- 50th (Northumbrian) Infantry Division (Ramsden)
- British 150th Infantry Brigade Group (Haydon)
- British 151st Infantry Brigade Group (Nichols)
- British 69th Infantry Brigade Group (Hassall)
- Polish Independent Brigade (Polish Free Brigade) (Kopański)
- 1st Army Tank Brigade (O'Carroll)
- 32nd Army Tank Brigade (Willison)
- XXX Corps (Norrie)
- 1st Armoured Division (Lumsden)
- 2nd Armoured Brigade Group (R. Briggs)
- 22nd Armoured Brigade Group (Carr)
- 201st Guards Motor Brigade (Marriott until 17 June then G.F. Johnson)
- 7th Armoured Division (Messervy)
- 4th Armoured Brigade Group (Gatehouse)
- British 7th Motor Brigade Group (Renton)
- Indian 3rd Motor Brigade Group (Filose)
- 29th Indian Infantry Brigade Group (Reid) from 5th Indian Infantry Division
- 1st Free French Brigade Group (Koenig) (under 7th Armoured Div command when defending Bir Hacheim[18])
- Army Reserve
- Indian 5th Infantry Division (Briggs)
- 10th Indian Infantry Brigade (Boucher)
- 2nd Free French Brigade Group
- 10th Indian Infantry Division (Rees) (arriving from Iraq)
- 20th Indian Infantry Brigade (MacGregor)
- 21st Indian Infantry Brigade (Purves)
- 25th Indian Infantry Brigade (Mountain)
- 11th Indian Infantry Brigade (Anderson) (from Indian 4th Infantry Division)
- 1st Armoured Brigade
- 5th Indian Infantry Brigade from mid-June (Russell) (from 4th Indian Infantry Division)
Axis
Panzer Armee Afrika (Erwin Rommel)
- Deutsches Afrika Korps (Walter Nehring)
- 15th Panzer Division (Gustav von Värst - wounded 29 May[48])
- 21st Panzer Division (Von Bismarck)
- 90th Light Division (Ulrich Kleemann)
- Italian XX Motorized Corps
- 132 Armoured Division Ariete
- 101 Motorised Division Trieste
Group Crüwell (Ludwig Crüwell)[nb 3]
- Italian X Corps
- 60 Infantry Division Sabratha
- 102 Motorised Division Trento
- Italian XXI Corps
- 17 Infantry Division Pavia
- 27 Infantry Division Brescia
- German 15th Rifle Brigade (detached from 90th Light Division)
See also
- Battle of Bir Hakeim
- North African Campaign timeline
- List of World War II Battles
Notes
Footnotes
- ↑ Churchill declared, "This was one of the heaviest blows I can recall during the war. Not only were its military effects grievous, but it had affected the reputation of the British armies."[1] The historian Ducan Anderson, in his work on the battle, stated: "The Battle of Gazala was a calamitous defeat for the Eighth Army that resulted in heavy losses, the fall of Tobruk and a pell-mell retreat to El Alamein. ...The battle had begun with the British stronger in terms of numbers and quality of equipment, especially in the Grant tank, than their opponents. ...The German High Command, however, had shown superior generalship throughout."[2]
- ↑ At the end of the Battle the 15th Panzer and 21st Panzer Division had only 44 tanks between them.[4]
- ↑ Group Crüwell was part of Panzer Army Afrika, but as a practical matter Rommel temporarily split his force in half; with Crüwell commanding the infantry formations along the original front line while Rommel joined the mobile forces in the flanking move. After Crüwell was captured on 29 May 1942, Group Crüwell was placed under the temporary command of Field Marshal Albert Kesselring who had been visiting the front.[49]
Citations
- ↑ Barr, p. 1
- ↑ Anderson, p. 75
- ↑ 3.0 3.1 Carver, p.167
- ↑ Ellis, p. 57
- ↑ Clifford, p. 236
- ↑ Clifford, pp. 237 - 238
- ↑ Clifford, pp. 238 - 239
- ↑ Playfair Vol. III, p. 223
- ↑ Toppe, p.A-8-18 & 19
- ↑ Mackenzie, p.541
- ↑ Toppe, p.A-8-19
- ↑ Mackenzie, pp. 544 - 546
- ↑ Clifford, p. 247
- ↑ 14.0 14.1 Avalanche Press website Ariete at Gazala Accessed 25 November 2007
- ↑ 15.0 15.1 15.2 15.3 Playfair Vol. III, p. 224
- ↑ Toppe, p. A-8-25
- ↑ Playfair Vol. III, pp. 223–224
- ↑ 18.0 18.1 18.2 Mead, p.298
- ↑ Toppe, p. A-8-22
- ↑ Playfair Vol. III, p. 225
- ↑ 21.0 21.1 Toppe, p. A-9-1
- ↑ "Tobruk (1942)". Worcestershire Regiment (29th/36th of Foot) Web site. http://www.worcestershireregiment.com/wr.php?main=inc/h_1942tob. Retrieved 14 August 2008.
- ↑ 23.0 23.1 French, p.219
- ↑ Paterson, Battle of Gazala and the Cauldron
- ↑ Toppe, p. A-8-30
- ↑ Mackenzie, p.548
- ↑ Playfair Vol. III, pp. 232–233
- ↑ Playfair Vol. III, p. 233
- ↑ 29.0 29.1 29.2 Playfair Vol. III, p. 234
- ↑ Playfair Vol. III, pp. 233–234
- ↑ Playfair Vol. III, pp. 235–236
- ↑ Toppe, pp. A-9-5 to A-9-7
- ↑ Clifford, pp. 260-262
- ↑ 34.0 34.1 Playfair Vol. III, p. 237
- ↑ Toppe, p. A-9-6
- ↑ Clifford, p. 264
- ↑ Mackenzie, pp. 554-555
- ↑ Clifford, pp.269 - 272
- ↑ Mackenzie, pp. 556 - 559
- ↑ 40.0 40.1 Mackenzie, p.561
- ↑ Mackenzie, p. 559
- ↑ Bierman and Smith (2002), p. ??
- ↑ Playfair Vol. III, p. 261
- ↑ Playfair Vol. III, p. 275
- ↑ Ellis 2001, p. 59
- ↑ Marshall 2002, p. 78-79
- ↑ Molinari & Anderson (2007), pp. 67 - 72
- ↑ Playfair Vol. III, p. 227
- ↑ Playfair Vol. III, pp. 227–228
References
- Barr, Niell (2006). Pendulum of War: The Three Battles of El Alamein. Overlook. ISBN 1585677388.
- Bierman, John; Smith, Colin (2003). Alamein; War Without Hate. New York: Penguin Books. ISBN 0-670-91109-7.
- Carver, Michael (1964). Tobruk. Pan Books. ISBN 0-330-23376-9.
- Clifford, Alexander (1943). Three Against Rommel: The Campaigns of Wavell, Auchinleck and Alexander. London: George G. Harrap & Co..
- Ellis, Chris (2001). 21st Panzer Division: Rommel's Afrika Korps Spearhead. Ian Allen. ISBN 0-7110-2853-2.
- French, David (2000). Raising Churchill's Army: The British Army and the War against Germany 1939-1945. Oxford: Oxford University Press. ISBN 0-19-820641-0.
- Mackenzie, Compton (1951). Eastern Epic. London: Chatto & Windus. 623 pages. OCLC 1412578.
- Marshall, Charles F. (2002). The Rommel Murder:The Life and Death of the Desert Fox. Mechanicsburg PA: Stackpole Books. ISBN 0-8117-2472-7.
- Mead, Richard (2007). Churchill's Lions: A biographical guide to the key British generals of World War II. Stroud (UK): Spellmount. p. 544 pages. ISBN 978-1-86227-431-0.
- Molinari, Andrea; Anderson, Duncan (2007). Desert Raiders: Axis and Allied Special Forces 1940-43. Oxford: Osprey Publishing. ISBN 1846030064. http://books.google.co.nz/books?id=v0T2gan40gQC&dq=san+marco+marines+tobruk&lr=&source=gbs_summary_s&cad=0.
- Paterson, Ian A. (30 December 1942). "History of the 7th Armoured Division: Engagements - 1942". http://www.btinternet.com/~ian.a.paterson/battles1942.htm#Gazala.
- Playfair, Major-General I.S.O.; with Flynn, Captain F.C. (R.N.); Molony, Brigadier C.J.C. & Gleave, Group Captain T.P. (2004) [1st. pub. HMSO:1960]. Butler, Sir James. ed. The Mediterranean and Middle East, Volume III: British Fortunes reach their Lowest Ebb (September 1941 to September 1942). History of the Second World War, United Kingdom Military Series. Uckfield, UK: Naval & Military Press. ISBN 1-845740-67-X.
- Toppe, Generalmajor Alfred (1990). German Experiences in Desert Warfare During World War II, Volume II. Washington: U.S. Marine Corps (via The Black Vault). FMFRP 12-96-II. http://www.theblackvault.com/documents/wwii/marine1/1296ii.pdf. Retrieved 1 December 2007.
- von Mellenthin, Friedrich (1971). Panzer Battles: A Study of the Employment of Armor in the Second World War (First Ballantine Books Edition ed.). New York: Ballantine Books. ISBN 0-345-24440-0.
External links
- German Experiences during The Battle of Gazala
- The Italian War Effort in 1942
- The World War II Study - North Africa
- BBC - WW2 People's War - Battle of Gazala
- Deutsches Afrikakorps Online Archive
- Flames of War
- New Zealand Electronic Text Centre - CHAPTER 5 Rommel Strikes
- Battle of Gazala
- Parliamentary Debates, House of Commons Official Report 2 July 1942